


Most often, I talk about how Giftster helps your family get gifts right every time for every occasion. Today, I’ll be talking about a unique use for Giftster that you may not have considered: helping charities and organizations coordinate donations and charitable gift giving. It’s something we’re seeing more and more, and we couldn’t be happier to help make this sort of gift giving easier for all.
The process is simple to set up and share for coordinators and organizers, and for those who would like to donate items to shop and mark things purchased and reserved. Here’s how to get it started for your charity:
Step 1: Go to https://www.giftster.com/account/register/? and create an account for your organization or charity.

Step 2: You’ll be brought to a welcome screen where you can create your first list. Select create a list to get started.

Step 3: Name your list. Add a note. that could include details like your donation drive name, and date ranges for the drive (if applicable).
Step 4: Choose your list privacy. It’s best to set the list to public so that contributors can shop your list without having a Giftster account. I also recommend that you set the list search to “Yes, on Giftster and Google” so your list has the best chance of being searchable in case a donor loses the link you send out. Press save when you’re finished.

Step 5: Start building your list! Add the items you’d like to receive for your drive. If they can be found online, use our handy Fetch feature to pull the details of the item onto your list. You can also manually enter the details and even upload an image of the item. If cash donations are always welcome for your charity, consider listing the link for that first or making it a 5-star rating so it will come up first on your list. This way, it can be easily found when viewing the list.
Step 6: Share your list! Click on the share link and you’ll find your list’s URL that can be shared anywhere you’d like: emails, newsletters, flyers, websites, etc. If you have the privacy setting for your list set to public, anyone can mark items reserved or purchased without having a Giftster account.
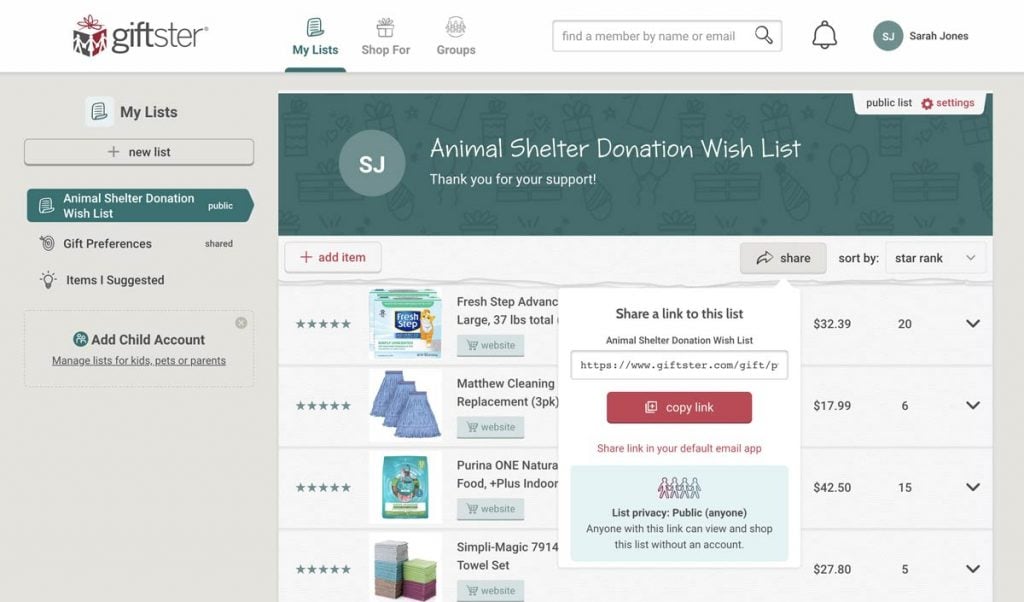
Donors can go to your list’s link to view the items your organization needs. Here, they can mark items reserved or purchased.
Want to see what others will see when they go to your list? Log out of Giftster and go to the link for your list. Expand each line item to see the details. See what’s been purchased and what hasn’t been purchased. Just remember, if you need to edit an item, you’ll need to log back into Giftster and go to the list and the item to make adjustments.
Don’t forget Gift Preferences! While this is optional, it is a great place to add details about your organization. Add your website URL, items that you are not able to accept, and your charity’s address, phone number, and contact person’s name. Make sure to make your preferences public so those viewing your account will be able to see it.
Share your organization’s Giftster story with us! I love to hear how people are using Giftster and how it takes the stress out of gift giving (and…in this case…donating to your favorite cause). Send me your story at [email protected] and put Hey Aimee in the subject. You never know…I may just feature your story in an upcoming post!


